
Best Crafts for Adults with Intellectual and Developmental Disabilities
Pinecone Bird Feeders

This is a great craft idea for seeing and identifying incoming wild birds. You can find joy in watching them eat.
To make a pinecone bird feeder, we need:
- Peanut butter
- Birdseed
- Shallow container, tray or baking dish
- Butter knife or spatula
- A piece of string or ribbon
- A pinecone

Instructions
- Pour some bird seed into shallow container which you prepared
- Cover your pinecone in peanut butter, making sure the pine needles are full of peanut butter inside the middle.
- Roll the peanut-butter-laden pinecone in the seeds to give it a good cover
- Tie string or ribbon to the top of the pinecone and form a loop to hang your feeder up outside.
Bug Hotel

Bugs are important for healthy gardens and gardens are great places to learn in and from. Some scientific studies have proved, gardening has been shown to relieve stress, alleviate depression, have a patient effect, and the senses can be stimulated as well.
Bug hotels give your bugs a playground during the summer days and hibernate in the winter months. If you build a bug hotel, they will come! Such as Solitary bee, ladybugs and other bugs
You’ll need:
- Bamboo stems, twigs, sunflower heads (optional), lichen, pinecones, wood shavings, and leaves to attract a variety of bugs
- A large wooden box or crate, you can find these at craft stores
- A drill
- Garden twine

Instructions
- Drill two holes in one of the shorter sides of your box in order to be able to hang your bug hotel and balance it evenly.
- Take 16” of twine and thread it through one of the holes. Tie a knot in the twine in the inside of the box, do the same for the other end of your twine using the second one.
- Pull on the string to make sure that it’s secure and will be able to hang your bug hotel.
- Once your buf hotel struction is ready, you can start adding your materials.
- Start at one end by laying the cut bamboo stems down so that the holes are facing outwards.
- Next, pack the rest of the materials into the remaining space in the box. Keep all of the similar materials together.
- When packing the materials in, make sure that they’re tight enough to stay and the bugs can get in!
- Hang your bug hotel in your garden and watch as they start to check-in!
Pompoms
You can use them to decorate your room or such artificial flowers in a vase decorated on the table.


You will need:
- Yarn
- Cardboard
- Scissors
- A circular template (like a large glass or plastic cup)
Instructions
- Draw 2 circles with the template on the card
- Cut the circles out
- Draw another small circle in the middle of each larger circle and cut these out as well
- Cut a length of yarn (long enough to trace the circles and leaving extra to tie)
- Slide the length of yarn in between the circles so that it can be sandwiched between the two circles and later used to secure the bits of yarn that will become your pom pom
- Place the two cards together with the length of yarn running parallel to the edges
- Pass the yarn through the centre and around the sides of the circle continuously, until the whole of the card is covered
- Take the scissors and cut the yarn around the outer edge between the 2 circles, making sure not to disturb it too much
- Using the length of yarn that is sandwiched between the circles, tie a tight double knot between the circles. This will secure all of your yarn together
- Remove the cardboard and fluff out your pompom
Fairy Glow Jars

Using the humble Mason jar with some glow in the dark nail polish and pixie dust, you can make a room look pretty magical.
To make fairy glow jars, you’ll need:
- 1 mason jar
- Glow in the dark paint
- Paintbrushes
- Paper to use as an easel
- Elmer’s glue
- A little bit of pixie dust (glitter)
Instructions:
- Pour some of the glow in the dark paint out on the paper so you can easily mix it when you paint your jar.
- Open up your jar and dip a paintbrush into the paint. Starting at the bottom of the jar, dab little specks of paint all over the inside of the jar. It’s important to cover the bottom of the jar first so you don’t smudge the sides when you get there.
- After you’ve covered the entire inside of the jar in specks of glow in the dark paint, leave it to dry. When it’s all set, leave it out in the sun for about a half hour so it can charge up the glow!
- While the jars are charging in the sun, you can take the top of the lid and cover it in a thin layer of Elmer’s glue. Sprinkle pixie dust all over it, making sure it’s covered in an even layer. When that dries, tap off the excess.
- Put the lid back on the jar and watch it sparkle! For extra magic, hang them up in your room so you can have your own DIY nightlights!
Seashell Sensory Bottles
Using liquid hand soap, food coloring and of course seashells, these Seashell Sensory Bottles
are one of the most perfect things to ever walk the face of this earth–or swim the deepest blue seas. Seashell Sensory Bottles look and act a lot like magic in situations where calm is needed quickly. Here’s how to make your own:

You will need:
- 1 cylinder-shaped bottle, preferable a Voss Water Bottle
- Blue liquid watercolor paint or food coloring
- Liquid hand soap
- Goo Gone
- Super glue
- Water
- Seashells!
Instructions
- Set your seashells in a bowl of warm soapy water. Let them sit while you take care of the next steps
- Use the Goo Gone to get rid of any stickers on your cylinder-shaped bottle.
- Place your clean seashells into the cylinder bottle, along with half a cup of water
- Put a few drops of food coloring or watercolor paint into the water
- Fill the bottle the rest of the way with liquid hand soap, place the lid on and (gently) shake it up!
- Allow the mixture to settle and you have your finished Calm Down Jar
Egg on a Stick

What you’ll need:
- 1-2 eggs
- As many sticks as eggs
- Paint, food coloring or styrofoam balls and glue
- Glitter, pens and extra ribbon to decorate (Optional)
Instructions
- You can either make a hole in the top and one in the bottom of the egg to slowly blow out the filling into a bowl or hard boil it. The first way, you’ll have eggs to eat but it does make the egg more difficult to handle without breaking. The hard-boiled method is quite a bit more forgiving.
- Go ham on your eggs! Paint them, stick things to them, dip dye them, do whatever strikes your fancy.
- Once your eggs are dry to the touch, hold up the egg, gently but firmly, and tap the bottom with the pointy end of the stick. For hard-boiled eggs, you will need to tap the egg and press a little harder. Now you have an egg on a stick!
Tip: These make for pretty great flower pot decorations.

Rock Painting
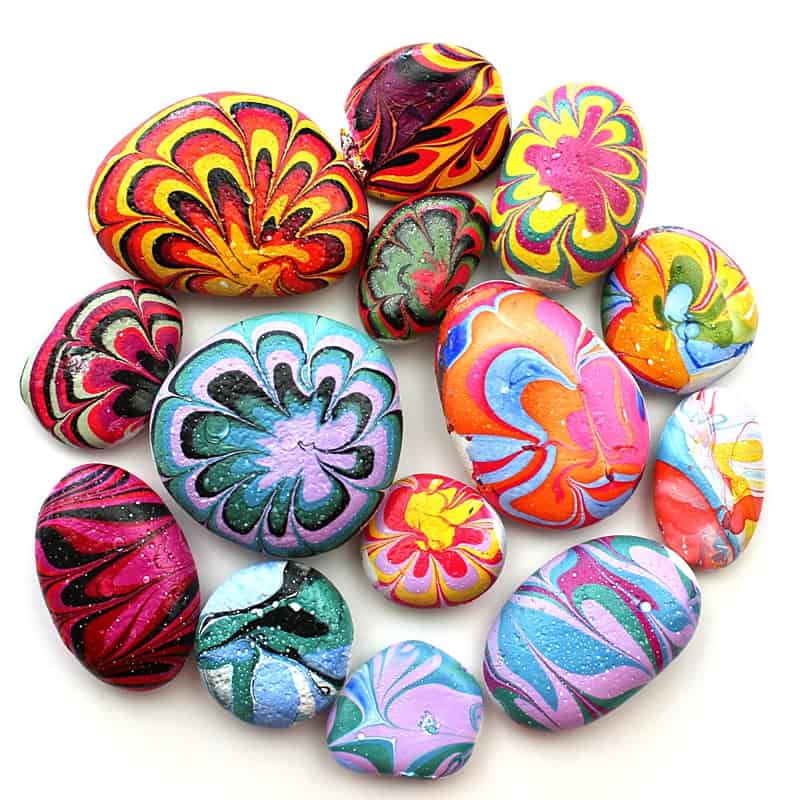
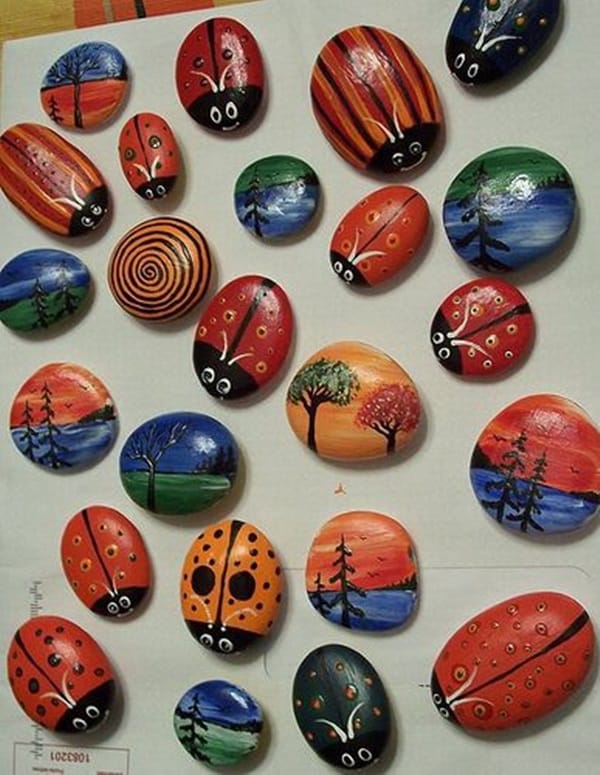

You will need:
- A few smooth rocks
- Acrylic paint in 3+ colors
- Art paint brushes
- Acrylic varnish to seal
Instructions
Paint your masterpiece however you want! If you like the design, seal it with the varnish. You can use these as paperweights or as colorful additions to the garden.
Source: Internet
